Video Trick Timer 2004
Initial Documentation
This document describes the Video Trick Timer 2004 program operation.
The intent of this redesign was to make the product more reliable by
using commercial controls rather than shareware controls and to simplify its
operation to make it more "user friendly".
The VTT04 consists of three basic screens as follows:
Setup
Capture
Timer
Setup Screen
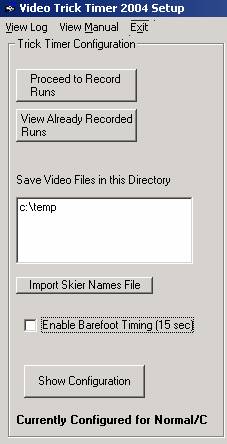
Menu Selections
View Log
View Manual
Exit
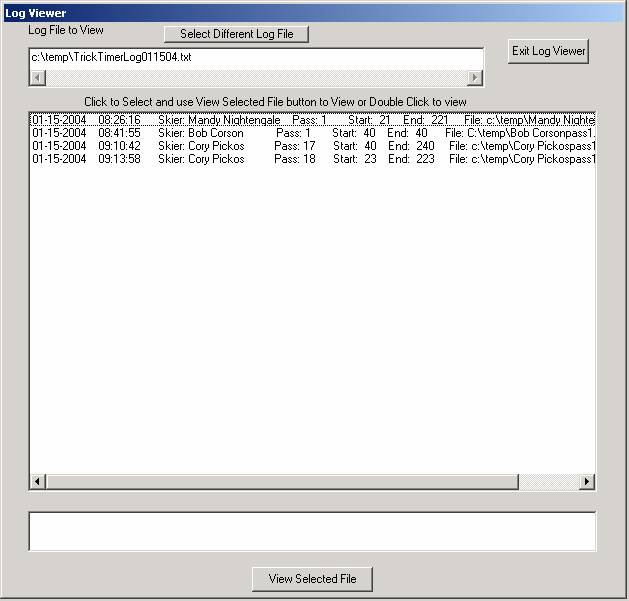
View Log
Each time a trick run is captured and processed through the timing screen, that information is recorded in this log. You can view any run or retime the run by selecting the desired run and then clicking the View button (or double-clicking the file) which will take you to the Timer Screen with the selected file loaded.
View Manual takes you to the screen you are now in Viewing the Manual.
Exit – Quit the program
Setup Screen Buttons and
Controls
Proceed to Record Runs
This button takes you to the screen where you will record the trick run and operate the audible timer.
View Already Recorded Runs
This button takes you directly to the screen where you select the start of the trick run. From there you can load a run to view.
Save Video Files in this Directory
Type in the folder where you will save the captured video files
Import Skier Names Button
If you have an already existing list of all of the skier’s names, you can import this into the program. Once that is done, you only have to select the name from a list rather than typing it as the skier has his turn. The list should be a plain text list with one name per line like this:
Jimmy Siemers
Cory Pickos
Nicolas Leforestier
And so on. You might want to alphabetize it if it is a large list.
Enable Barefoot
Checking the textbox sets the trick run time to 15 seconds for barefoot.
Show Configuration
Clicking this button reveals all of the technical parameter settings for your video hardware. This will vary for each system.
The most important items to select here are the resolution which probably should be 320x240, the compression method (Microsoft 1 or Indeo) and the frame rate.
The frame rate must be 30 (25 for PAL) for an R tournament, 15 or higher for an L and 10 for normal or class C. You must set these parameters to some combination where during the capture process, you will not drop frames. The faster your computer, the better. Making the picture smaller or the capture slower may be required so that you do not lose frames. Losing frames should not affect the timing, but it might affect your ability to select the correct start frame if you drop frames at that point.
Once all of these parameters have been set, you can hit the “Hide Configuration” button and should not need to access this screen again as all of the parameters are saved in the Registry on this individual computer.
Capture Screen
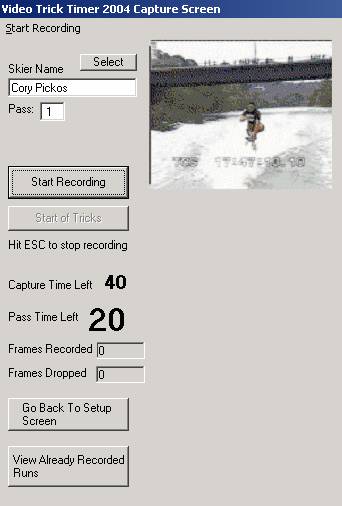
When you enter the capture screen, the program first checks the name of the file
that you will save the capture to. The name of the file is the skier's name followed by the pass number. If a file already exists for what you have set up, a warning will tell you, but not prevent you from saving the file.
The Start Recording button will be highlighted. The idea is to start to record when the skier passes the 50m "can't change the speed" buoy. The recording is set to run for 40 seconds. A countdown timer will show how much time is left.
You can just let the capture process happen and take no further action on this screen. It will automatically switch to the Timer Screen when it is finished.
You can also use the Start Recording Menu to start
recording. Just hit the ALT key
to select the menu and then when you are ready to start hit the ENTER
key.
There is a Start Trick Timer button. The function of this button is to tell the program where the skier starts. This will make it easier to position to the exact start point in the timer screen. It also activates a start horn and then in 20 seconds an ending horn.
A 20 second timer countdown (15 for barefoot) is shown. If you press the Start Trick Timer button and there is less than 20 seconds left on the recording time, the file recording time will automatically be extended by 25 seconds from that point.
To stop recording at any time, press the ESC key. Some examples might be if the skier falls or if the pass is over and you do not want to wait for the full 40 second time to end.
Pressing the ESC key or waiting until the recording time expires both have the same effect of switching to the timer screen.
Status boxes show the number of frames saved and the number of frames dropped. The initial configuration should be set so that no frames are dropped.
You can also go back to setup or on to the timer if you decide not to record the run.
Pressing the Select button brings up the list of skiers to select from if one had been loaded in. Just double-click on the skier you want and that name will be loaded in. You may also type in a name.
Timer Screen
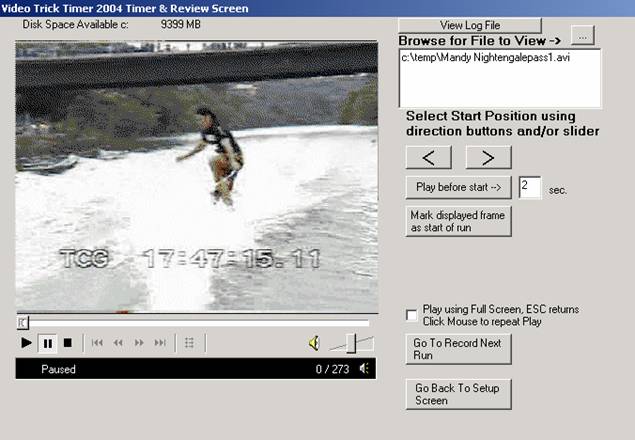
If you get to the Timer Screen via the recording process, the recorded file will be loaded.
If you used the "Start Trick Timer" function, the video will be positioned at the point where you pressed the button. If you did not use the start timer function, the video will be positioned seven seconds after the start of the run, which hopefully will be close.
Use the slider, arrow buttons, or keyboard arrow keys to move to the exact start frame.
Press the "Play Before Start" button to play for 2 seconds up to the point you selected.
Do this as much as required to ensure that your selection is correct. You can change the 2 second value if you want. You can also use the full screen by checking the option box that says "Play using full screen". You get back to the regular screen by pressing Escape.
Once you are happy with the selection press the "Mark Displayed Frame" button This will set that frame as the start and the play the last 5 seconds of the run up to the end of the run so you can identify the last trick.
You can also with the "Play to end, pause, continue" button, play past the end point as that may clarify what the last trick was. This process also locks in the start frame so that you can’t change it.
If you want to you can also use the full screen by checking the option box
that says "Play using full screen". You get back to the regular screen by pressing Escape.
The normal process would then be to go back to the Recording Screen using the button.
You can also get to the timer screen directly to measure
existing files. Use the selection button
![]() to pick a file to view or measure. When you select a file that already has been
measured, you will receive a warning that tells you what the measured start
frame already measured was.
to pick a file to view or measure. When you select a file that already has been
measured, you will receive a warning that tells you what the measured start
frame already measured was.
You can also access the log file which will allow you to view the runs that you have already captured and measured.
The status bar underneath the video player shows you the frame counts.